
There are so many different settings you can customize for gaming that we often want to know what the best DNS/MTU/NAT Type is. It’s the same for IP addresses, but do they really work in this way? Is there is “best” IP address that gamers should use that will give a better connection?
To understand this better, we need to distinguish what an IP address is, and how it works. Here is a summary answer:
There is no “best” IP address for gaming, since IP addresses do not work in the same way as other settings like DNS/MTU/NAT Type. For the vast majority of online gamers, just using the default IP address assigned by your console and router will be perfectly adequate.
The more crucial issue for connectivity for gamers is actually often the NAT Type, which is indirectly related to the IP address, but cannot usually be changed by altering the IP address. This needs to be handled in different ways.
So the bottom line on this is that IP addresses are usually best left alone, though there are other related settings that can sometimes be modified to give better results.
Let’s look in more detail at what an IP address is, how to customize it for gamers, and whether or not it makes any difference.
What is an IP Address?
IP addresses work for games consoles just the same as they do for other devices. They are a unique identifier for any device which reveals specific details like the location and ISP. They are roughly equivalent to what a postal address/ZIP code does for real homes, but for devices instead. Every single device which connects to the internet needs an IP address.
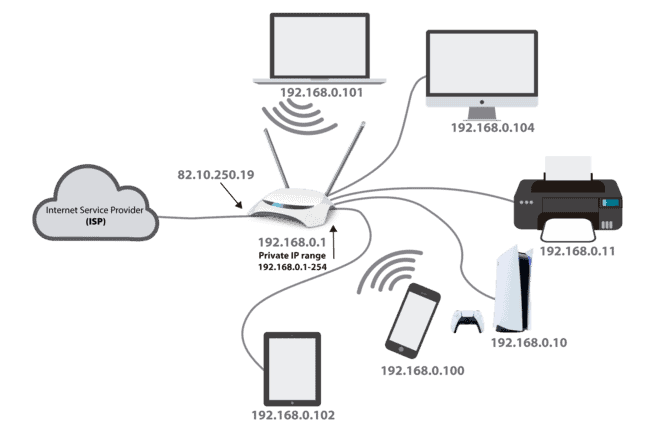
IP addresses are split into a public IP (assigned to a single house/router), and a private IP (assigned to individual devices on a home network – this is the common 192.168.0.1-254 IP range you may have seen when looking at IP addresses on devices). Public IP addresses are unique.
The bridging protocol between public and private IP addresses is Network Address Translation or NAT, which is why NAT types can be so important for gamers. Having an inefficient system of translating public IPs to private can hinder connectivity to other gamers. We’ll cover this in more detail further below.
See the diagram below for a visual of this. The public IP for the home is 82.10.250.19 (totally unique to that home), while all the devices in that home are assigned a unique private IP along the range 192.168.0.x, where x is a unique number between 1-254 given to each device that connects to that router.
It’s important to make this distinction, since when we are talking about changing an IP address (also called setting a static IP), we are talking about modifying the private IP address within your home for more efficient networking. Changing the public IP can also be done with a VPN, but in reality is even less likely to be of any use than changing your private IP in most cases.
Setting A Static IP For Gaming (Easy Way)
If you just leave you IP settings as default for your games console/PC, then your router will use a protocol called Dynamic Host Configuration Protocol (DHCP) to automatically assign an IP address along this private range to your console. And in most cases, this is all you need; it works totally fine.
However, it is possible to manually over-ride this process and set your own static IP with any value you want in this private IP range.
There’s two ways of doing this; here’s the easier way, for the PS4/PS5:
- Go to Settings…Network….Set Up Internet Connection
- Select Wi-Fi or LAN depending on your connection
- Select Custom setup for LAN
- For IP Address, switch to Manual and input the following values:
-
- IP Address – 192.168.0.x, where x is any number between 100 and 254 (you choose)
- Subnet Mask – 255.255.255.0
- Default Gateway – 192.168.0.1
- Primary DNS – 8.8.8.8
- Secondary DNS – 8.8.4.4
-
- Run through the rest of the settings as they are, without changing them.
- Save and test your internet connection to see if you can get back online.
- Alternatively, you can go to Settings.…Connection Status before you start, and note down all the above settings with a pen and paper, and then go and reconfigure the connection, entering the details as you noted them, but just changing the last digit of the IP address. Sometimes IP addresses, Subnet Masks and Default Gateways do change depending on where you are in the world.
- See our full article on PS4/5 Static IP for more on this.
- See the video below for a demonstration of how to do this for the PS4/PS5. The general process is very similar for the Xbox One/X; see here for our article on this.
However, this isn’t technically correct, since by doing this you could assign an IP to your console that’s already in use by another device on the network, which can lead to IP address conflicts and connection problems. This is why just leaving it to Auto DHCP settings is usually the best way, since your router will assign IPs in a way that these conflicts never occur.
In theory, as long as you pick a high number for the last digit, in between 100 and 254, then in most cases, you should be fine. But is isn’t always guaranteed and sometimes IP conflicts can occur doing it this way.
Setting a Static IP For Gaming (Correct Way)
However, there is also a technically correct way to manually assign an IP to your games console, in a way that in theory should prevent these clashes occurring, but requires that you log into your router.
Here’s the process for this longer winded way of setting a static IP:
- Make a note of the current IP address and MAC address of your console. In the PS4, these are in the “Internet Connection Status” page of the Internet Settings which is under the “Network” menu
- Log in to your router. This usually means typing in a specific IP address into a browser address bar; it is often 192.168.0.1, 192.168.1.1 or 192.168.1.254 or may be something different. If you don’t know it, it will be on the back of your router somewhere along with the login password.
- Enter the admin/password – check the back of the router if don’t know them.
- Once logged in, go to “Advanced Settings” or something similar.
- Select “LAN Setup/Settings” or something similar.
- Select “Address Reservation”, “DHCP/IP Reservation” or similar. Click “Add” to add a new static IP address.
- Input an IP address you want the console to have. The field is usually filled out as 192.168.1.x with x being the custom number you put in to uniquely identify your console. This can be anything from 1 to 254; it is usually best to pick something in the middle like 100. You can put in the IP your console currently has if you noted it down.
- Add the MAC address also as noted down.
- Give the device a name (eg. Mike’s PS4).
- Add the IP address, save settings and reboot the router.
- Reconfigure the internet connection on your PS4 using the Easy/Automatic settings to ensure ALL settings are set to default or automatic as the router is now handling IP addresses. Don’t set anything manually using this method, as your router is handling all that now. Just pick Easy/Auto Setup.
- See our full articles on setting a static IP on the PS4/5 and Xbox One/X for more details, and also the video below for a visual demonstration of reserving a static IP on a router. See another demo video here.
Example 1:

Example 2:
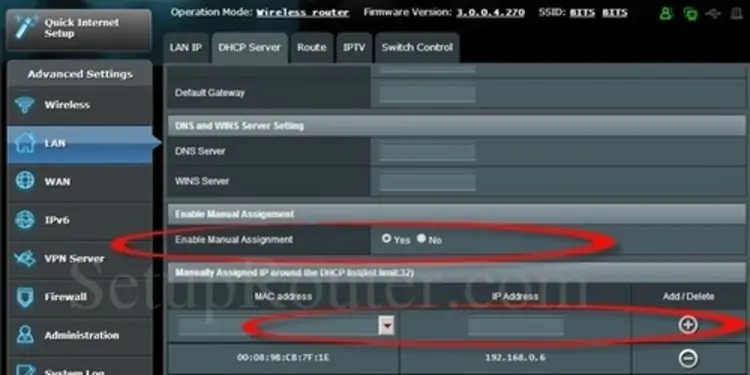
The menu system is a little different for each router brand, but the general process is the same: Find IP/DHCP Reservation settings, enter your device’s MAC address, plus the fixed IP address you want to reserve for it, into your router’s DHCP settings and click Add/Save.
That’s it! You have now assigned a static IP address to your games console. As long as you live in that house, your console will always have that IP address as that is what you have manually assigned it through the router. If you were to move house you would obviously have to repeat the process on the router in the new house.
If you left the IP as Automatic/DHCP, then it would periodically keep changing as the router would issue new IP addresses to all devices at a set interval (The DHCP lease time).
The point of doing all this, is that once you’ve set a static IP for your games console, you can now move onto the next step of Port Forwarding, where you then open up certain ports to and from your games console on your router, using the fixed IP address you’ve set for it as a constant reference point so the router knows the device it is dealing with all the time. This is meant to improve connectivity for gamers.
If default DHCP was still in use, then the IP address would likely change periodically, making it hard to apply permanent settings like port forwarding.
See our articles on forwarding ports for the PS4/5 and Xbox One/X consoles if you’re interested. The definitive resource for this is portforward.com, which has specific customized directions on how to port forward for almost every router brand and model that exists.
However, there usually isn’t any need to go to these lengths; let’s explain why in the next few sections.
Do You Even Need To Use a Static IP For Gaming?
The bottom line on this is that most gamers probably don’t need to even bother using a static IP, since there are easier and more important ways to optimize your connection to servers and other gamers that are easier to apply and have more impact.
In many cases, online gamers literally don’t need to adjust ANY settings, including the IP address. Just using a wired connection and Automatic/Default settings for your console can be plenty good enough, especially if your ISP understands the needs of gamers and has gamer-friendly default settings on it’s routers and wider network.
In other cases, there can be a benefit in changing certain settings – we’ll cover this below – but usually not the IP address.
Nevertheless, here are some possible benefits of using a Static IP For Gaming:
1. Port Forwarding – As mentioned above, setting a static IP can be a precursor to the long winded, manual method of port forwarding for games consoles. However, a simpler way to achieve the same outcome (open all ports to your games console and get Open NAT Type) is just to use DMZ settings instead. Can be done much more easily and quickly than manually opening up individual ports for specific consoles/games.
2. Blacklisted/Banned IPs – In very rare cases, a public/external IP could be blacklisted or blocked, in which case manually assigning a different one can help get around this and give you access to game servers. However, in reality this is not very common. Some VPN providers advertise this; however, be very wary of this, as routing your gaming traffic through VPN servers can massively increase ping, which is something you don’t want for any fast paced multiplayer games. May work for slower paced gaming.
3. DMZ Settings – In some cases, the DMZ setting on a router actually requires a static IP address to be used rather than a MAC address. In these cases, settings a static IP can be helpful as a first step to allowing DMZ to be used. Also some routers may not even have DMZ settings, in which case using static IPs and port forwarding could be useful. However, even in this case, enabling UPnP settings can be an easy way to get the same result again. See our article which covers all these methods of opening ports in terms of simplicity and effectiveness. Also most routers now will allow you to configure DMZ settings with your console’s MAC address only, which means you don’t even need to set a static IP.
How to Optimize Your Connection For Gaming
As mentioned, setting a static IP address may in some cases be useful, if it then allows you to apply other settings like DMZ or manual port forwarding. However, in most cases, it just isn’t really going to be the difference-maker in terms of delivering the best possible connection to other gamers online, which is why most people are probably researching this issue.
So here are some other things which can be crucial in making sure you have a good connection for online gaming:
- Type of connection – Always use a wired connection and not Wi-Fi for the best connection. Probably THE most important factor, beyond any settings changes. Get off wireless connections for ping sensitive games especially. Use a powerline adapter if you can’t run a cable direct to your router.
- Location of players – Play against players closer to you geographically to keep ping down.
- NAT Type – Is an important factor; NAT Type 2 is usually OK, but NAT Type 3 is problematic. Again placing your console in the DMZ section of your router automatically applies Open NAT (Type 1), which gives the most open connection possible.
- Network congestion – You may find often lag the most when your home network is busy, with lots of users trying to connect at once. If this is the case, use QoS settings to prioritize your games console on your home network to keep ping down even at peak usage times. Using wired and not Wi-Fi also helps massively with this.
- Equipment – Use high quality ethernet and HDMI cables, plus a gaming monitor if you are really serious. Plug your controllers in to reduce input lag.
See our up to date article on reducing lag for the PS5, which covers other ways to optimize your connection. The advice generally applies to all other games console as well.
And here are some settings which actually DON’T improve your connection, despite the hype on forums on YouTube:
- DNS Settings – Changing them CAN sometimes improve speeds, but can’t improve ping, which is the most important factor. See our article which covers this in detail.
- MTU Settings – Doesn’t make a difference changing this; just leave as default. In very rare cases can help you circumvent PSN outages, but otherwise doesn’t need messing with. See our post on this. Much like IP addresses, there isn’t a “best” MTU value for everyone.