Changing NAT Types is a common question for gamers, but many of us want to specifically know if there is a way to do this on a gaming device itself, without needing to access the router. We might not have access to the login details of the router, or might not want to go messing around with settings on it, so is there a way to modify NAT Type without doing this?
Here is a bottom line answer:
Changing your NAT Type is not possible without logging in to your router first. However, you may be able to guess or find your router login details online so you can login to it and change settings without having physical access to it.
NAT settings govern how your router allows devices to connect to other devices online, so it is unfortunately not possible to modify these settings without logging into the router itself.
Nevertheless, even if you don’t have physical access to the router at this moment, it’s often still possible to find the login details online and gain access to it, and from there changing NAT settings can be done relatively easily using DMZ settings.
Let’s go through the different ways you can get the login details of your router, whether you have physical access to it or not, and the go through how we can change NAT Settings on the router itself.
Option #1 – Gain Physical Access To Your Router
If you possibly can, you should try to gain physical access to your router, as this is by far the easiest way to actually get the login details so you can get into the router and change your NAT type for games consoles (Xbox 360/One/X and PS3/4/5) or PC.
Almost all routers have some kind of sticker on the side or back with the login details, so if you get these, you can easily access the router and change NAT Type or other settings with any device connected to it.
Something like this:
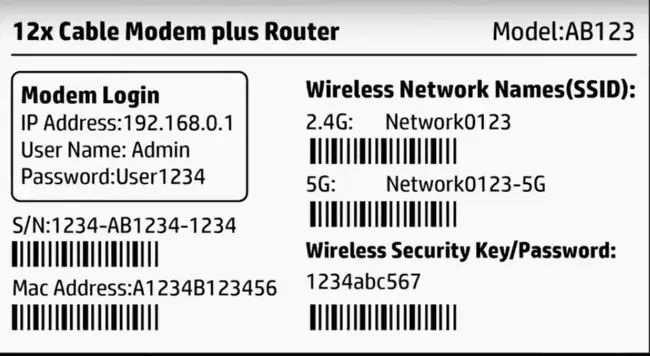
If you can get access to the router, then note down the router login IP, username and password as circled above. You can then use these details to access the router settings, as long as they have been left as these defaults and not changed. Then skip to the later section on DMZ, as you are literally ready to go and change your NAT Type settings from within the router.
If these details have been changed, then you’ll have to either get the details off the person who knows, or perform a full factory reset of the router to revert all usernames and passwords back to the defaults indicated on the sticker (probably won’t go down well with other people using the internet in your house at the time, who will get cut off!).
If you cannot gain physical access to the router, then you’ll have to be a bit more creative in finding out your router login details, but there are some ways you can possibly do it. Let’s look at these now.
Option #2 – Guess Your Router Login Details
This is more of a long shot, but it can sometimes be possible to literally guess what your router login credentials are, since there are certain values for the router login IP and username/password especially that are very common. You can try these values and sometimes you’ll find they work.
Let’s list some common values you can try:
- Router login IP – In the English speaking western world, the default router login is often 192.168.0.1 or 192.168.1.1 or 192.168.1.254. More rarely, it may be 10.0.0.1 or some close variant. Try typing in these IP addresses into the browser address bar of any device currently connected to the router. If a pair of admin/password boxes pop up, you know that this at least is right.
- Username/Admin – The default router admin is often just admin or administrator
- Password – The default router password can sometimes be just password or password1, but is often something else nowadays for security reasons, like the router serial number. This can often be the sticking point – you can guess the router login IP and admin, but can’t guess the password. If so, skip to Option #3. But admin and password (small case) can sometimes work.
- Sometimes the admin and password are BOTH ‘admin’ (common) or BOTH ‘password’ (less common), so you can try this as well.
Also remember that you don’t need to be plugged into a router with a cable to login to it. You can also do so if connected via Wi-Fi. Any device that is connected to a router (wired or wireless) can login to it, so as long as you have the correct login details, you don’t need to be right next to it physically to log in. You can do so on Wi-Fi (having said that, wired connections are preferable to Wi-Fi for gamers anyway).
Option #3 – Find Your Router Login Details Online
If you cannot guess the login credentials of your router by trial and error using some common values, then the last option is to try and find the default login admin/password of your router online.
This can be tricky if you don’t know the exact model of your router, but if you at least know your ISP (internet provider), and the router is one of theirs that they sent out with the installation, then you can usually start here.
If you search for your ISP plus “router login” online, you can often find the default login IP/username/password for their different routers/wireless hubs online.
Here are some starter links for the bigger ISPs:
- America – Comcast/Xfinity defaults are username/password, see here and here, Verizon here, AT&T here. Sometimes the password is ‘password’ or ‘password1’; other times it is a unique value like the serial number of the router, in which you’ll need physical access to get it.
- UK – Click the links for common default login details for BT, Virgin Media, Sky, TalkTalk, Plusnet
- Canada – Click the links for Bell, Shaw, Telus and Rogers common router login details.
- Australia – Click the links for Telstra, Optus and TPG router login details.
Again, as mentioned above, you don’t need to be on ethernet to login to a router; you can also login remotely when on Wi-Fi as long as you’re connected to that router and have got the correct login details.
If the default details you look up or find on the router don’t seem to work, then you’ll have to reset the factory back to default settings (provided you’ve got permission to do this), usually by pressing in a reset hole with a safety pin or something similar for around 10 seconds. This reverts everything back to the defaults indicated on the router.
Using Port Forwarding to Change NAT Type
Provided you can gain access to your router, then there are a couple of ways of changing your NAT Type, preferably to Open NAT, as this is the best for online gamers.
The first method is more long winded and technical, and involves manually opening certain specific ports on your router for certain applications, games, or games consoles. This is actually not our preferred method, as it can be cumbersome and slow to do, but is very precise and specific, opening up only the ports you need.
Here is an overview of how Manual Port Forwarding works:
- You firstly set a static IP address for your games console/PC, which provides a constant reference point to forward ports to on your router. See our full guides on this for the PS4/5 and Xbox One/X consoles.
- You then use the excellent portfoward.com resource to find ports you need to forward for your console and also for specific games on your console. Find them and note them down; the port forward resource is comprehensive.
- Log into your router, go to Port Forwarding, select or enter your console’s static IP, and then manually enter the ports you noted down above for your console/game (TCP and UDP). Save settings when finished.
- All those entered ports are now fully open to your games console, which should theoretically put you on Open NAT (Type 1).
However, this can be a really time consuming process, or the complexity of it just stops non technical users even trying. Thankfully, there is often a quicker and easier way of achieving the same outcome, which we’ll cover next.
Using DMZ For Open NAT (Preferred)
If the manual method of port forwarding sounds a bit too cumbersome, then there’s another way of doing the same thing – just place your games console into the DMZ section of your router, which automatically opens ALL ports to your console for Open NAT, without any need for manual configuration for individual ports. It just opens them all automatically and is our preferred method for opening the NAT Type for better connectivity to other gamers.
Using DMZ settings does also require you to log into your router, but is much easier than manual port forwarding.
Here are the general steps for DMZ:
- Prep – Log into your router using it’s IP address (often 192.168.0.1 or 192.168.1.1) plus admin/password found on the back or online. Find DMZ settings and check whether it asks for an IP address or MAC address to configure. MAC address is easier option. If it requires IP address then follow the link to set a static IP address.
- Find and note down your console’s IP and/or MAC address in the Connection Status/Settings menu depending on what the router needs entering. These settings are easy to find within the menus of all games consoles.
- If required make the current IP address fixed or static by re-configuring your connection manually with the IP address as described in this video. If the router only requires a MAC address entering in DMZ then you don’t need to do this step.
- Log into your router using it’s IP address and password, found on the back or on Google. 192.168.0.1 or 192.168.1.1 is most common for the IP address. Type this into your browser’s address bar and enter the router password.
- Go to DMZ settings, usually under “Security” or “Advanced” or similar.
- Enter in your console’s static IP address you just configured if needed, or MAC address depending on what it asks for. If it asks for just the MAC address the whole process is easy; some routers ask for an IP address which requires we configure a static IP as detailed above.
- Save settings and exit router. You have now placed your console in the DMZ for fully open ports and Open NAT type.
- See our full article on DMZ for more detailed steps, plus demo videos.
Note – DMZ is safe to use for games console, but NOT usually recommended for PCs and other devices. See our article on the safety of DMZ for more explanation on why this is the case.
An Overview of NAT Types For Gaming
Let’s also provide readers with a quick overview of NAT Types, so you have more of an idea behind the role of NAT in gaming, and why changing to Open NAT is preferable.
NAT stands for Network Address Translation, and is a protocol which allows devices still using the IPv4 protocol can communicate with each other. The use of NAT stems from the fact that under the IPv4 addressing system, there are not enough unique IP addresses to cover every device in the world, so there has to be a protocol which translates public IP addresses (assigned to a house or router) to private IP addresses (the common 192.168.0.x range you see when you check current connection settings of games consoles).
See this diagram for more of a visual explanation:
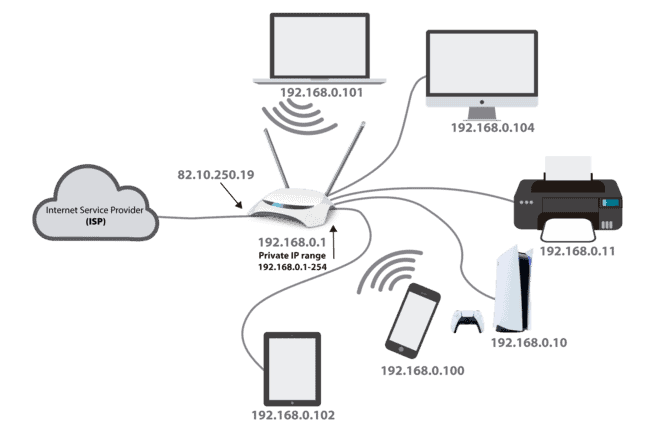
NAT translate public IPs (eg. 82.10.250.19) to a private IP address range (192.168.0.x)
NAT is the protocol which does this translating, and there are different types of NAT with differing levels of restrictiveness, which can affect the ability of devices to properly connect with each other online. This is why having a Strict NAT Type (Type 3) can be problematic for gamers, leading to lobby, game chat and party problems as one console cannot “talk” to another console because they are on incompatible NAT Types that block out some of the connectivity.
Moderate NAT Type (Type 2) is mostly OK, but can still sometimes have problems. Open NAT Type (Type 1) is the best, as it removes all connection restrictions and can talk freely with all other NAT Types.
See the table below for a good summary of the connectivity “openness” between different NAT Types.
| Console 1 | ||||
|---|---|---|---|---|
| NAT Type | Open (Type 1) | Moderate (Type 2) | Strict (Type 3) | |
| Open (Type 1) | ||||
| Console 2 | Moderate (Type 2) | |||
| Strict (Type 3) |
Open NAT type is best as it can communicate with devices on all other NAT types; Moderate is OK as it can communicate with devices on Open and Moderate type; Strict is worst as it can only talk to Open NAT type devices
See our full article on the Best NAT Type For Gaming for more explanation of this issue.
Placing your console into the DMZ section of your router should automatically put it on Open NAT Type for the best connection to other gamers, which is why it is our preferred method. Using manual port forwarding can also do the same thing, but is a bit more difficult to do.
Either way, changing the NAT Type of a device for gaming does require you to access your router, which is usually possible in a roundabout way if you don’t currently have direct access to it.