This is a common question in home networking, as sometimes we find that the original place our Wi-Fi router is installed is not really optimal, and we want to know if we can move it to another room. Perhaps this can be to provide a better overall signal throughout the home, or a better location for plugging devices in by LAN cable. Is it possible to do this?
Here is a short answer:
A router can be moved to another room, but it must remain connected by cable either to the original phone line master socket that was installed by your provider (for combined modem-routers), or to the modem if it is separate from the router. Depending on your setup, using either a longer RJ-11 or RJ-45 cable can allow you to do this.
In other words, sometimes you are restricted by how far you can move your router from it’s current place close to the internet access panel in your home. The router must remain wired up to this access point (also sometimes called the master socket), since this is what connects it to the internet nodes in the street, and then to the broader internet.
Moreover, routers are often wired to this wall panel differently, and depending on how it is set up, there may be options available to you to move it if you are willing to use long cables.
However, here is the most common way to move a router to another room, if your connection comes in through the phone line:
- Get a longer RJ-11 phone line cable
- Plug this into the internet phone jack/converter
- Feed this cable through to the room you want to move it to.
- Connect the other end of this cable to the router Internet/DSL port
- Your router is now installed in this room.
In this post, we’ll aim to provide as many different options as possible to move your router from it’s current location, depending on how it is currently wired to the access point/master socket in the home which feeds to the outside street cabinet/node.
Sometimes it comes in through the phone line and goes directly into a router; other times it goes into a modem which then goes into the router. Other times coaxial cables are involved. The cables used to move your router will be different and we’ll cover all the cases so readers get what they need depending on how their internet is set up.
If moving your router is not possible, then there are some other roundabout solutions we’ll cover which can also either expand connectivity or create new wired and wireless access points around the home.
Solutions If The Router is Connected By Cable From The Phone Line
Most internet now comes in through the phone line, and these are the easier cases to deal with when trying to move your router to another room. However, even here, the network can still be set up differently, depending on whether the router and modem are combined or separate. We’ll cover both cases here.
Scenario #1 – All in One Wi-Fi Router – This is one of the easier and common scenarios – if your router and modem are all contained in one wireless “hub”. Basically, if there’s just one black or white box that’s installed with your internet, it means that both the modem and router are in there somewhere. This is the most common way newer fiber optic internet is installed.
When this is the case, your internet usually comes in through the phone line, firstly feeding into a small phone converter socket that splits off the phone line from the internet if needed. Something like this:

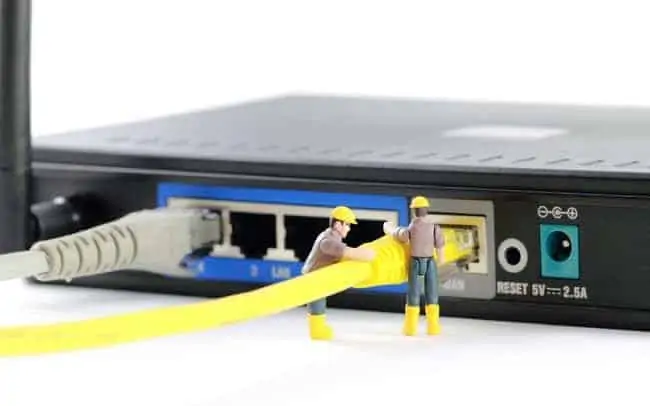
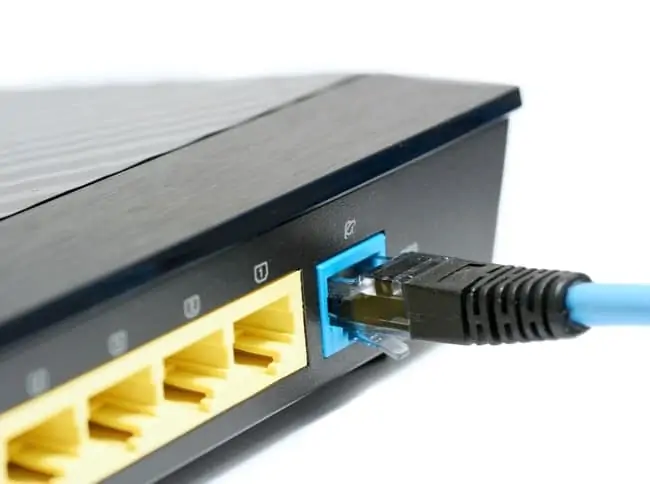
That black cable is an RJ-11 cable (similar to a standard RJ-45 ethernet cable, but not quite the same), and that goes straight into the back of the differently colored Internet/Broadband/DSL/ADSL/Fiber port on the back of your router, something like this:
If this is how your internet is set up, you just need to buy a longer RJ-11 cable, to connect to the phone line converter and your router, so you can feed it through to a different room. Be careful though, as RJ-11 and RJ-45 (ethernet) cables look very similar, but in this case, using a longer RJ-45 cable won’t work. You need specifically an RJ-11 phone line cable.
Like this:
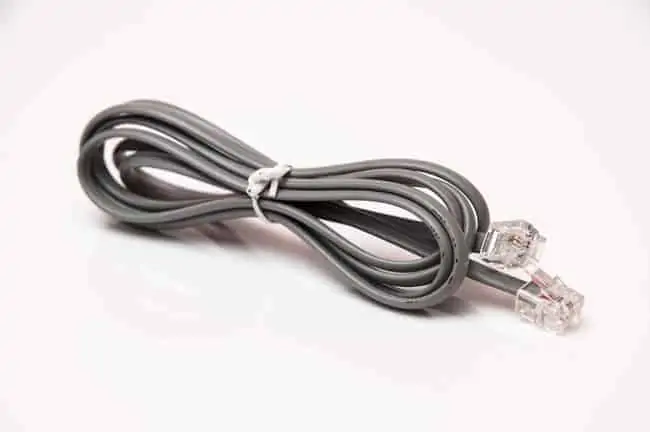
Even longer cables are available, and from personal experience work well up to 20 meters at least.
It looks very similar to an RJ-45 ethernet cable, but the end pin connector is slightly smaller and squarer. The DSL/Internet/Broadband port will also be shaped a little differently to the standard LAN ethernet ports (the yellow ones above) you’d plug devices into on the home network. Check the ports and cable ends carefully to make sure you get the right one. If it’s a WAN RJ-45 port, we cover this in scenario #2 below.
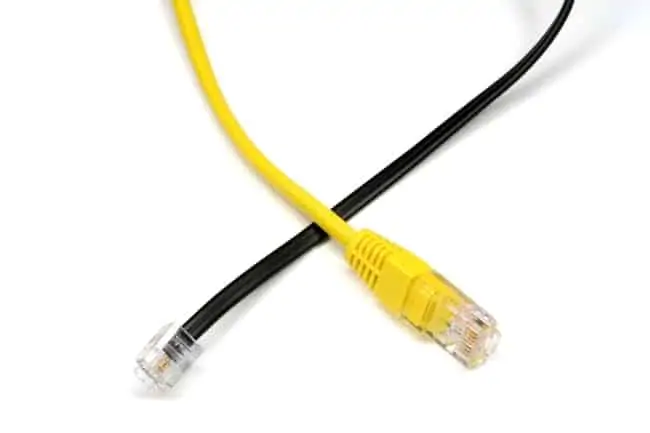
RJ-11 – Black; RJ-45 (Ethernet) – Yellow
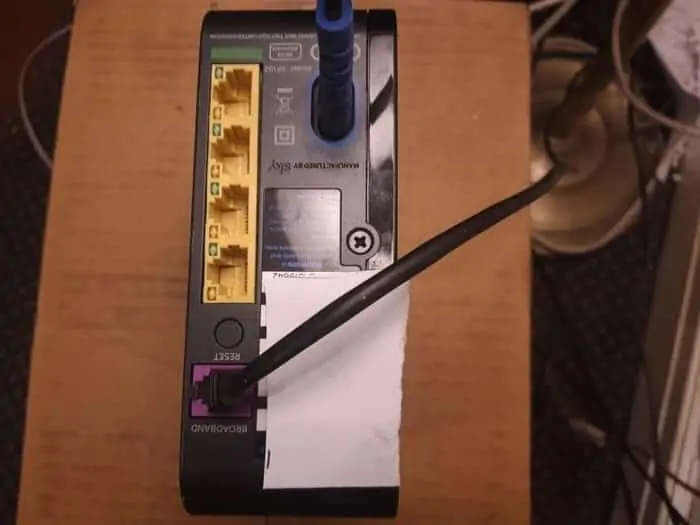
Scenario #2 – Separate Modem and Router – Can be the case on older installations, where you actually have two separate devices installed. The phone line often feeds through to a small modem similar to above, but this modem is then in turn connected to the Wi-Fi router, most often in this case by a standard RJ-45 ethernet cable which goes into the differently colored WAN port on the back of the router. Something like this:
In this case, you just need a longer standard LAN/ethernet cable of the RJ-45 type; the same as you’d use to plug devices into the LAN ports on the back of the router.
Again, remember to check the port on the back of the router to make sure you get the right cable to move the router but keep it connected to the master socket/installation panel.
- DSL/Internet/Broadband/ADSL Port – Slightly smaller, squarer, often on combined modem routers. Needs RJ-11 cable.
- WAN Port – Larger standard RJ-45 ports, same as the LAN ones next to it. Connects router to modem when they are separate. Needs RJ-45 cable.
Solutions If Your Router is Connected By Coaxial
This can be the case on much older internet installations that haven’t been upgraded for a long time, but also sometimes super high speed packages of 200 Mbps or more. Sometimes your modem is connected to the wall not by an RJ-11 or RJ-45 ethernet cable, but still by the older coaxial cable.

If you have multiple coaxial sockets installed in the home, the first thing to do is check if it works simply by switching to the coax socket in another room, and seeing if the connection transfers over fine. Sometimes it will.
If this cable is easily accessible and un-screwable at both ends (router and access/installation panel), then you can also try using a long coaxial cable to feed the router through to another room. Simply note what connector is at each end (male is the pin that sticks out, female is the inverse of this that the male pin can screw into) and buy a longer version of what you already have.
Click here to view a 20m Coaxial Male to Female Cable on Amazon. Get Male to Male though if this is what you need for your connection.
If you don’t want to be messing around unplugging anything at the internet installation panel end, for fear of losing your internet, then you can also use a coaxial extension pin from Amazon to plug the modem-end coax pin into, and then feed another long coax cable (Male to Male) out the other end of the extender to your modem in another room. Or just try different coax sockets if you have them installed around the home, though they may not work if they are old.
The Best Place To Install Your Router
The optimum place to install your router does depend on house layout, device location, and what you want from your internet. However, in general, here are some good rules to follow:
- Store your router in a central, elevated position in the house for the best dispersion of signal.
- Store it in a place free from obstructions.
- Store it in a place free from interference from other electronic and wireless devices.
- Store it in a clean and well aired place to avoid overheating and dust gathering in the vents.
- A good rule of thumb would be upstairs, somewhere near the center of the house, if you have devices all over the house that need Wi-Fi access.
- Obviously, any of these rules can be over-ridden if you have specific needs.
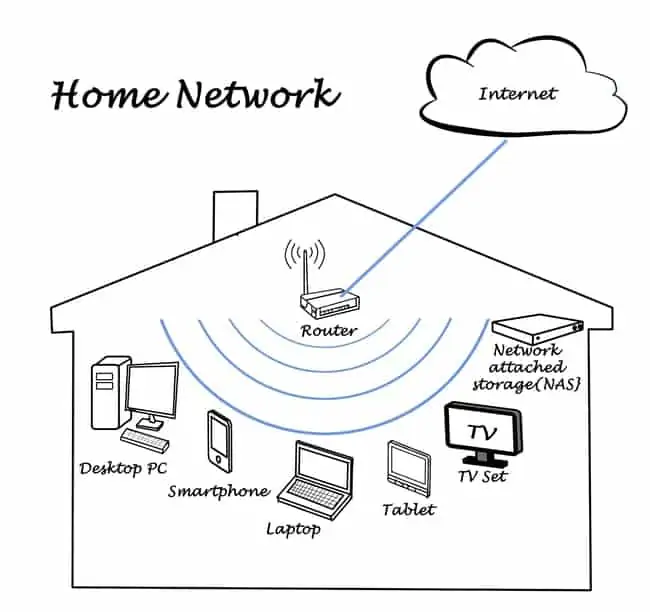
Place your router where it can best disperse the signal to the devices that need it.
Alternative #1 – Expanding a Home Network With Switches
This is a closely related alternative to moving your router. You can instead leave your router where it is, and feed out a long ethernet cable to your other room, and install a multi-port ethernet switch in that room to connect devices up to.
Switches are closely related to routers, but merely forward data and don’t do anything else. They are technically the correct device to use to expand a network (you shouldn’t really connect routers to other routers).
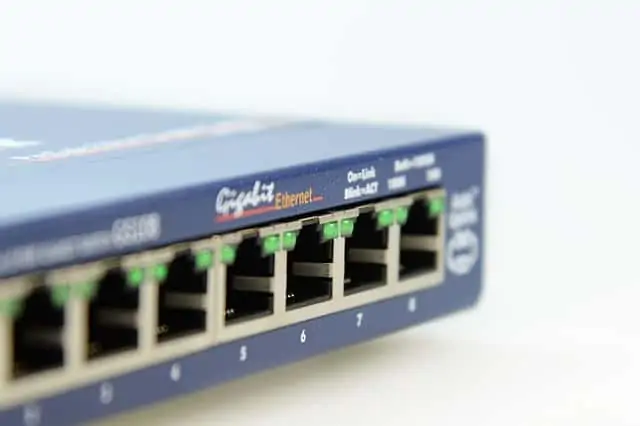
Most switches come equipped only with ethernet ports, which isn’t much use for people who want to use Wi-Fi, but switches with both are available:
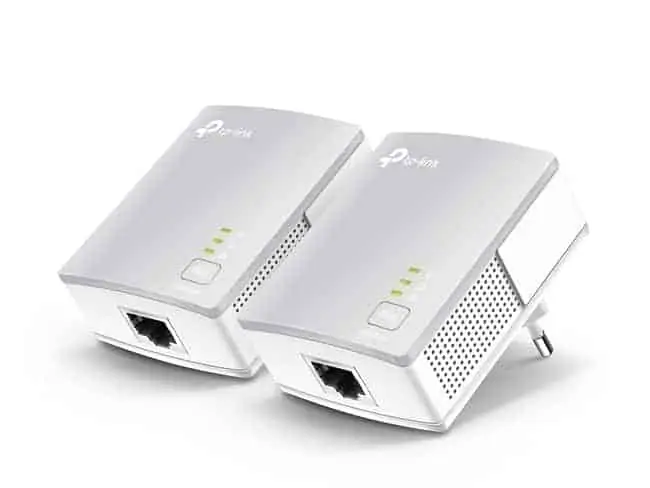
Alternative #2 – Using Powerline Adapters to Expand Home Networks
This is an excellent alternative solution for users who want to install access points in different rooms, but DON’T want to be messing around trailing long network cables through the house to move a router from it’s original access point/panel/master socket connection.
Powerline adapters allow you to bypass the need for any DIY or long cables by using a pair of adapter plugs which are installed in wall sockets and transfer data between each other to provide internet connections to wherever they are plugged in (they can basically turn a wall socket into an internet connection).
Powerline adapters come as a pair. You plug one adapter in and connect it to your router with a short ethernet cable; you plug the other adapter in wherever you want another internet access point installed, and connect to a device. The two plugs then communicate through the electrical wiring of the house to deliver a wired internet connection without the need to move your router or have long cables trailing around.
They can be a great way of sending internet connections through to other rooms whilst keeping your router where it is. They are also simple “plug and play” products with no complex setup or DIY needed, as opposed to moving your router, which can require some work.
See this page for more models.
Scenario #1 – You just want to install just a wired ethernet access internet access point(s) in one specific room (or a couple of rooms). In this case, a standard powerline adapter is what you need – models are available with between 1-3 ethernet ports depending on how many devices you want to connect up at the receiving end. You can also chain these adapters together to create a powerline network with multiple access points around the home, circuitry permitting (see caveats below).
Scenario #2 – You want to install wired AND wireless access points in a room or couple of rooms. In this case, go for a wireless powerline adapter model, which can have between 1-3 ethernet ports to connect devices up, but also a cloned Wi-Fi access point at the receiving end to connect smaller devices to via wireless. It’s like installing a little mini Wi-Fi router in that wall socket.
Caveats to powerline adapters – Let’s add some important qualifiers to powerline adapters. They do rely on the circuitry of the house being in good condition to allow the adapters to properly communicate. Watch out in older houses with worn or complex circuitry – the adapters might not be able to talk to each other across the circuits. They can also be prone to interference. They can work across circuit loops/rings, but there may be a drop in speeds. See our full article on when you might have trouble getting them to work for more information. Some users are disappointed, but many find they work fine; it’s a real mixed bag.
Alternative #3 – Wireless Products To Expand Connectivity in The Home
If none of these options is possible to you and you’d rather stay totally on wireless, but just spread better coverage around the home, then there are home networking products you can get to help with this – Wi-Fi extenders/repeaters/boosters and Wi-Fi Mesh Systems.
Let’s offer a brief summary of each product in turn:
Wi-Fi Boosters/Extenders – Simple, single plug extenders that you install in a wall socket, and they capture and amplify the existing wireless signal from the router, spreading it over a slightly larger area. Can be bought cheaply, but hit and miss in terms of performance. Some users get mediocre results depending on distance; others get great results with them. Can be like installing a second mini-router when they work well.
Wi-Fi Mesh Systems – More expensive and advanced pieces of kit that consists of nodes you install around the home that provide more comprehensive wireless coverage over a larger area. Better for larger homes where you want coverage to all corners. You’ll pay much more than you will for extenders though.
See also our comparison article on Extenders vs Mesh for more pros/cons between the two types of product. Mesh Wi-Fi especially can be a good alternative if you’d rather leave your router where it is, but spread better wireless throughout the home, and are prepared to spend some money to do so.