We have already covered how to set up a static IP and fort forward for the PS4 in a separate article, but what about for the Xbox One/Xbox X console? Is the process any different?
The process for setting up a static IP is pretty similar for the Xbox One console – the general process is in fact identical, with just a few menu settings different.
Setting a static IP address for your games console effectively fixes or “locks down” it’s IP address permanently, which then allows you to port forward to that fixed IP address. Port forwarding is effectively a method of prioritizing certain traffic to your games console, so that all data from certain ports automatically gets sent the games console by the router.
This can potentially reduce latency by removing any barriers data has to pass through first before it gets to your console.
Let’s look in more detail how to do this for the Xbox One games console specifically.
(Static) IP Addresses – Brief Summary
Let’s first very briefly go through how IP addresses work. IP stands for Internet Protocol and an IP address is a unique specific device identifier that every thing must have if it sends or receives data over the internet. So this includes games consoles.
We do not need to go any further into this here, only to state that IP addresses issued by a router to devices are by default not normally fixed or permanent; they are prone to change from time to time.
IP addresses can be fixed though by customizing certain settings within a router or device. This sets a permanent or fixed IP address for a device such as a games console, which means that console will always have that particular IP address, unless it is moved to another house or you change the router settings again.
In itself this is not really much use, but it does allow you to do the next step of fort forwarding, which can help you to reduce lag in online gaming.
There are actually a couple of different ways of setting a static IP for the Xbox One – one easier and one more difficult but precise. The first method involves assigning a static IP through the Xbox console itself; the second more difficult method involves assigning a static IP through your router, which is the more correct way of doing it.
However, we will cover both methods for users who are not confident messing around with router settings. Let’s look at each method in turn.
Method #1 – Setting a Static IP on Xbox Console Itself (Easier Method)
Let’s start off with the easier shortcut method of setting a static IP on the Xbox One/Xbox X. You can do this entirely on the Xbox itself if you want, though it is technically speaking not the correct way to do it. We’ll explain this more when we detail the second method further below.
Here are the very quick steps for setting a static IP on the Xbox console itself:
- Go to Settings…Network….Advanced Settings
- Note down with a pen and paper all the network settings on the right of your screen as they are – IP Address, Subnet Mask, Default Gateway, plus DNS servers. You don’t need the MAC addresses for this.
- Once noted down, click IP Settings…..Manual
- Enter in the following settings manually for each value.
-
- IP Address – 192.168.0.x, where x is any number between 100 and 254 (you choose)
- Subnet Mask – as you noted it down
- Default Gateway – as you noted it down
- Primary DNS – 8.8.8.8 or as you noted it down
- Secondary DNS – 8.8.4.4 or as you noted it down.
-
- Save and test your internet connection to see if you can get back online.
- See the video below for a demonstration of how to do this.
Important – When doing this, note down the settings on YOUR screen, not the ones on his screen.
That’s it! You have now assigned a static IP address to your Xbox games console, though through an easy, shortcut method rather than the correct way.
The reason this method is not strictly technically correct is because routers already assign IP addresses to devices on a home network, and so by setting one yourself as we noted above, you could technically be choosing an IP address that is already in use on your home network by another device, causing IP address conflicts.
However, in reality this is not likely to happen as long as you choose a high number – which is why we suggested picking a number between 100 and 254 – for the simple reason that there tends only to be a maximum of 20 devices on a home network, while there is space for 254 separate devices (the last digit of the IP can be from 1-254).
So as long as you have a normal number of devices on your home network, there isn’t really much likelihood that you router is going to go above 100 in assigning IP address to specific devices.
Sure, IP addresses tend to be “leased” for a specific time by a router, after which they expire, and the router issues a new one, but even accounting for this, IP addresses are still recycled and re-used once a “lease” expires and the assigned number rarely surpasses 100 on most home networks with a normal number of devices. So picking a high number above 100 should be fine most of the time.
However, for Xbox gamers who want to do the Static IP thing more correctly, let’s go through the long winded method below.
Method #2 – Assigning a Static IP For Your Xbox Through Your Router (Technically Correct Method)
For those more confident with using routers, there is a more complete and correct way of assigning a static IP for your Xbox One/Xbox X. It is slightly more long winded but in reality is not actually that difficult to do. It usually just requires logging into your router and customizing a few settings.
It is impossible to provide a definite guide as the menus and settings on every router are different, but we have a generic list of the steps required to do this below. The specific menus may have slightly different names depending on your router make and model, but here are the general steps:
- Go to Settings….Network…..Advanced Settings on your Xbox One.
- Note down all the settings as they appear on the right. You may also need your MAC addresses this time. Note down the wired or wireless MAC depending on what connection type you are on.
- Log in to your router. This usually means typing in a specific IP address into a browser address bar; it is often 192.168.0.1, 192.168.1.1 or 192.168.1.254 or may be something different. If you don’t know it, it will be on the back of your router somewhere along with the login password.
- Once logged in, go to “Advanced Settings” or something similar.
- Select “LAN Setup/Settings” or something similar.
- Select “Address Reservation”, “DHCP/IP Reservation” or similar. Click “Add” to add a new static IP address.
- Input an IP address you want the console to have. The field is usually filled out as 192.168.1.x with x being the custom number you put in to uniquely identify your console. This can be anything from 1 to 254; it is usually best to pick something in the middle like 100. You can put in the IP your console currently has if you noted it down.
- Add the MAC address also as noted down.
- Give the device a name (eg. Dave’s Xbox).
- Add the IP address, save settings and reboot the router.
- Reconfigure the internet connection on your Xbox One using the Easy/Automatic settings to ensure ALL settings are set to default or automatic as the router is now handling IP addresses. Don’t set anything manually using this method, as your router is handling all that now. Just pick Easy/Auto Setup.
- See the video below for a demonstration of this longer winded method; plus another demo video here.
Example 1:

Example 2:
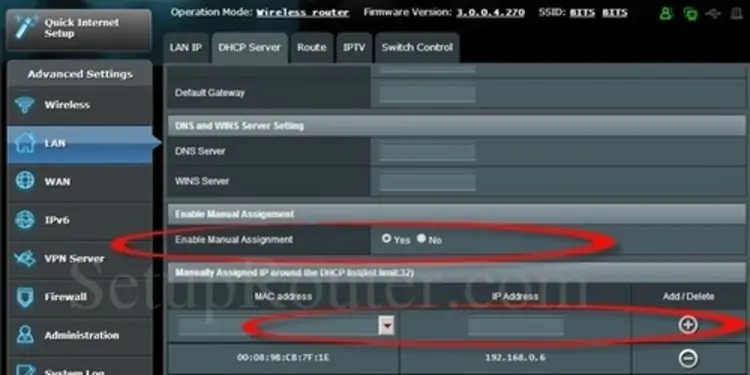
The menu system is a little different for each router brand, but the general process is the same: Find IP/DHCP Reservation settings, enter your device’s MAC address, plus the fixed IP address you want to reserve for it, into your router’s DHCP settings and click Add/Save.
That’s it! You have now assigned a static IP address to your games console. As long as you live in that house, your console will always have that IP address as that is what you have manually assigned it through the router. If you were to move house you would obviously have to repeat the process on the router in the new house.
You can now move onto the next step of Port Forwarding to the games console.
How to Port Forward on the Xbox Consoles
Now that you have set a static or fixed IP for your Xbox One, you can port forward or prioritize all traffic to your games console, which has the potential to reduce lag in online gaming. It basically removes any digital barriers for any data going to and from a games console, minimizing the delay in any data transmission and hopefully reducing latency in the process.
As with setting a static IP address, there are too many different router makes and models to make a definitive list here, but the process is usually similar.
The definitive resource for this is portforward.com, which has specific customized directions on how to port forward for almost every router brand and model that exists.
![]()
For convenience here are some links to the pages for the most common ISPs in the UK and US: BT, Virgin Media, Comcast Xfinity, AT&T and Verizon Fios. From these pages you can then pick your specific router model and follow the directions from there on how to forward your games console for that router.
The general process to port forward tends to be as follows, though each router has its own menus and settings:
- Note down the fixed IP address you set for your Xbox either on the console or through your router.
- Log in to your router as described above, using the 192.168.x.x IP format and the login password on the back of the router.
- Go to “Advanced Settings” or similar.
- Go to “Port Forwarding”.
- Add all ports separately as directed in the guide for your router on portforward.com. There is usually an “Add” button that you click an just add the port value to the relevant boxes for each port you need to forward. Ports for specific games can also sometimes be specified.
- Ports can be individual numbers, or ranges, and can be TCP or UDP categories, or both. Add them as specified by the portforward.com resource.
- For each port/port range added, also match it to your Xbox One console, by it’s IP or MAC address you noted down. This tells your router to forward the selected ports to this fixed IP address you’ve already set.
- Continue doing this for all the ports the portforward.com resources tells you to add. You can also do this for specific games.
- Save settings and reset the router.
- See the video below for a demonstration of how to do this. Specific Ports mentioned for the Xbox One are: 80, 3074, 53, 80, 500, 3544, 4500
We get that for non technical people, this more correct way will seem like a real pain to do, manually inserting all these ports/ranges and linking them up to your Xbox One/Xbox X’s IP address.
The good news is that quicker, easier ways of basically achieving the same outcome of port forwarding do exist, though they are slightly less precise and just open up all ports on your router indiscriminately.
See our article on the three main ways of port forwarding for games consoles. Using DMZ settings is our preferred method, as it doesn’t require any messing about entering specific port values one by one. You just place your Xbox One or other games console into the DMZ section of your router and you are good to go.
Summary
You have now port forwarded your Xbox console through your router! Because you have set a static IP address, the ports you have forwarded will always go straight to that IP address you have set for your games console, hopefully reducing any barriers and delays of data being send to and from your console and thus reducing lag for better online gaming.
Unfortunately Port Forwarding is not available on all routers so you will have to check the portforward.com resource to see if your router is listed. If not, then you will have to resort to other ways of achieving basically the same outcome of port forwarding or other ways of reducing lag on your console.
Alternatively, a gaming router may be another option for you, as they are often designed to optimise connectivity for gaming and can sometimes automatically handle issues like port forwarding and quality of service for you. See our article on gaming routers for more on this.