
We have already covered the manual way of port forwarding on your games console as a way of potentially improving connectivity and reducing latency for online gaming.
To people not familiar with or interested in networking it can seem a little complicated and long winded. Some people don’t want to be fiddling around too much with router settings as well, so are there any other methods we can use to achieve the same results?
There are in fact several ways you can configure your router to allow for port forwarding for your games console, some much easier than others, but they can all achieve basically the same results. So we will expand upon our first article on the subject to look at three different ways you can implement port forwarding.
Here is a very quick summary of the three main methods compared:
- Manually port forwarding – more time consuming but technically correct and precise.
- UPnP – Easiest method but least precise and may have safety implications.
- DMZ – Fairly easy and much quicker than manual method. Safe for games consoles. A good compromise between the first two methods.
Each methods has its pro’s and con’s, so lets examine each of them below in more detail.
Method 1 : Manually Port Forwarding Using Specific Ports (Complicated but Precise)
We have already gone into this method in more detail in our article on port forwarding, but will briefly describe it again here, as it is the most thorough and customizable method of port forwarding despite being the most difficult and long winded way of doing it.
It basically involves manually assigning a static IP address to your games console and “opening up” certain ports on your router in order to forward all traffic to this IP address and therefore straight to your gaming console so as to reduce delays for online gaming.
We will not repeat ourselves here as we already explained how to do this in our other article on port forwarding, we have also embedded the video on how to do it here:
Setting a Static IP For a Games Console (Quick Method)
Here are the main steps for setting a static IP;
- Make a note of the current IP address and MAC address of your console. In the PS4, these are in the “Internet Connection Status” page of the Internet Settings which is under the “Network” menu
- Log in to your router. This usually means typing in a specific IP address into a browser address bar; it is often 192.168.0.1, 192.168.1.1 or 192.168.1.254 or may be something different. If you don’t know it, it will be on the back of your router somewhere along with the login password.
- Once logged in, go to “Advanced Settings” or something similar.
- Select “LAN Setup/Settings” or something similar.
- Select “Address Reservation”, “DHCP Reservation” or similar. Click “Add” to add a new static IP address.
- Input an IP address you want the console to have. The field is usually filled out as 192.168.1.x with x being the custom number you put in to uniquely identify your console. This can be anything from 1 to 254; it is usually best to pick something in the middle like 100. You can put in the IP your console currently has if you noted it down.
- Add the MAC address also as noted down.
- Give the device a name (eg. Mike’s PS4).
- Add the IP address, save settings and reboot the router.
- Reconfigure the internet connection on your PS4 using the Easy/Automatic settings to ensure ALL settings are set to default or automatic as the router is now handling IP addresses. Don’t set anything manually using this method, as your router is handling all that now. Just pick Easy/Auto Setup.
- See the video and our article for a demonstration of this longer winded method.
Once you have done this you will need to use the portforward.com website, as it is the definitive resource for port forwarding for games consoles, containing all the ports you need for all the major games consoles and games to successfully forward traffic to your console from your router without any delays.
You firstly need to visit portforward.com and look up the specific console and game you need to forward the ports for. Ports are usually given in TCP and UDP format, make a note of both ports given for the game you need as you will need to put these into your router.
Next log in to your router using it’s IP address and password, found on the router (192.168.0.1 is most common, though other addresses such 192.168.1.254 are also used).
Scroll through the various settings menus until you find port forwarding options, usually under “Advanced” settings or similar. Again portforward.com has a comprehensive list of instructions for each router make and model.
Once you find the setting you need to input the ports you noted down in each category (TCP and UDP) as instructed and add the IP address/MAC of your console (find these in your console connection settings/status menus) and link these rules to your console by entering the static IP address you have already set for your console.
Port Forwarding – The Longer Manual Method
The benefits of this method are that it is the most thorough, reliable way of port forwarding as it sets these rules for your console only and right down to specific games.
So it is the most customizable and precise way of port forwarding allowing the user 100% control over which ports and devices use port forwarding.
On the downside it is the most complex and time consuming way of doing it, and requires quite a bit of noting stuff down and fiddling with router settings to get it done. Also some routers can have a fiddly interface that does not make the process particularly easy or straightforward and it is not available on all routers.
This can serve to put people off trying this altogether, as it just involves too much messing round with router settings. The good news is that the next two methods are much easier and quicker to implement, requiring just one easy settings change in both cases, though they offer less customizability and control.
Lets look at the second method of UPnP settings below.
Method 2 : Enabling UPnP Settings on Your Router (Much Easier but Less Customizable)
The second method of port forwarding is to simply enable UPnP settings on your router. UPnP stands for Universal Plug and Play, and is a way of quickly forwarding all ports to a device on a home network automatically with one setting change and no additional configuration needed like there is with the more complex first method.
To enable UPnP you simply log in to your router using the 192.168.x.x format (0.1 most common) and simply check that UPnP settings are set to “On”.
They are usually found under “Security” or “Advanced” settings or similar, and many routers actually enable UPnP by default. It is really that simple!
For this reason it is perfect for people who don’t want too much messing around with routers and changing loads of settings and just want to change one thing and then forget about it.
It is also a fairly reliable and widely supported method of port forwarding, working on all major games consoles. It is a shortcut method of port forwarding for all devices on a network.
For this reason though it is the most generic and least customizable form of port forwarding, and when enabled it simply forward all ports to all devices and not just selected one to your device. For this reason it can be sometimes inefficient when other devices on your network are requesting data from certain ports.
There have also been some safety concerns regarding UPnP, as when enabled it effectively bypasses one layer of security on a home network by automatically forwarding all ports to all devices without any checks.
Most of these concerns apply mainly to older equipment and routers, as many of the vulnerabilities of UPnP have been long since patched. Nevertheless see here for a good article weighing up the pro’s and cons of UPnP safety.
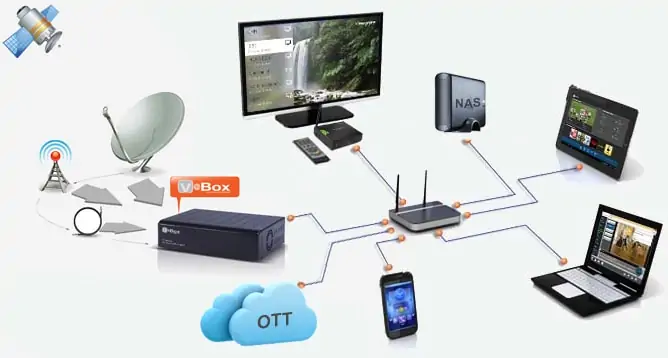
Universal Plug and Play (UPnP) automatically forwards ports to all devices on a network when enabled on a router
To put these concerns in perspective though, they do not apply to games consoles as they cannot download anything from the internet in the conventional sense that other devices like PCs can. Of course they do download games, patches etc. but only through official channels and servers that the vendors like Microsoft and Sony control and secure.
For this reason it is impossible for a games console to pick up a virus in the way that a PC could, simply because users cannot download anything outside the official channels and servers.
Similarly games consoles do have internet browsers but only very basic ones that do not have an ability to download anything and so cannot pick up viruses from suspect sites as a PC browser might.
So enabling UPnP will not pose a threat to games consoles as they cannot get viruses in the way other devices can.
However, as UPnP is a generic indiscriminate protocol that forwards ports to all devices on a home network, there may be a potential security risk to other devices on a network that can download stuff. So if there are other people using a home network on devices other than games consoles, their device security has to be taken into account.
In fairness though, many of the concerns about UPnP go back well over a decade and have long since been fixed. Newer technology has become far better at implementing UPnP more securely and for this reason it is often enabled by default on routers anyway.
Also there are other layers of security such as antivirus software and device firewalls that can adequately protect devices without having to worry too much about UPnP.
In summary UPnP is the easiest shortcut to port forwarding and an excellent alternative for those who don’t want to mess around with manually port forwarding. It offers a trade-off of ease versus security, though the potential security threats are really minimal and lessen the more modern your equipment is.
Method 3 : Use DMZ Settings (A Great Compromise Between the First Two Methods)
This is our favourite method of port forwarding, as it is almost as easy as UPnP, but is more customizable and safe as it can be done on a device by device basis.
It is the perfect compromise as it does the job of forwarding ports to your games console without affecting other devices and without needing any complex configuration.
Also, as with UPnP any safety concerns around using DMZ do not apply to games consoles, as we will explain later.
DMZ stands for Demilitarized Zone and is simply an area on your router where devices are “free” to send and receive data with no obstacles or blockages.
The checks and firewalls that traffic would normally have to pass through are not applied to any device placed in the DMZ. See our full article on DMZ settings for a full overview of the topic.
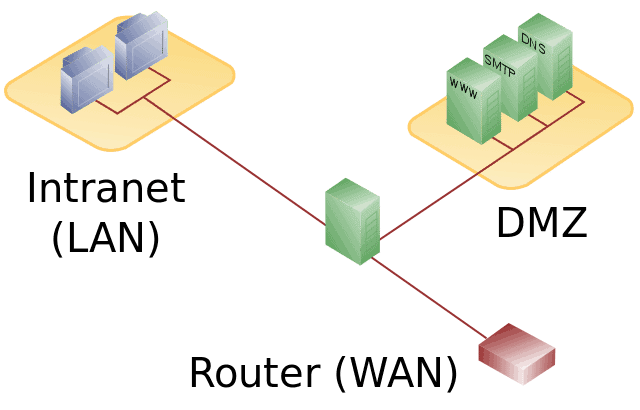
A router will automatically forward traffic without filtering to all ports on any device that is placed in the DMZ on a home network
Here are the very quick steps to configure DMZ Settings:
- Get the MAC address of your console (Connection Settings/Status).
- Log into your router by typing it’s IP address in any browser (often 192.168.0.1 or 192.168.1.1) and the password.
- Find DMZ Settings under Security or Advanced or similar.
- Enter or select your console’s MAC address and to place it in the DMZ.
- Save settings and close.
- See our linked article on DMZ for more detailed steps.
This is great easy way to reduce delays in traffic getting to your console, and in addition it almost always solves any NAT issues that can also arise with games consoles and lead to connection issues in lobbies and chat parties. So you can solve two problems for the price of one, and implementing DMZ is really easy and quick – one setting change and you are done.
Whilst there are safety concerns around using DMZ for devices such as PCs and Laptops, none of these concerns apply to games consoles for the reasons we mentioned above.
Games consoles cannot download anything outside the official content and channels vetted and secured by the console vendors, and so cannot catch viruses in the same way other devices can.
So whilst we don’t recommend placing any other devices on a home network in the DMZ, it is perfectly fine to place game consoles in them. See our article on the safety of DMZ for more on this.
In addition using DMZ could be argued to be inefficient, as it forwards every single port to your games console and not just the ones it actually needs for a particular console and game (usually just a couple), but this doesn’t affect the gaming experience so can’t really be argued to be a negative.
For gamers wanting 100% control and customization over the exact ports they forward we recommend the more complex manual Method 1 we outlined above.
For this reason, placing your console in the DMZ is our number one recommended method for port forwarding for games consoles (not other devices), as it is very easy and quick to do, effectively forwards ports, and does not have any of the safety concerns that other devices might in the DMZ.
See the video at the top of the page for a full comparison of the three methods with pro’s and con’s for each, so you can decide which method is best for you.