A lot of internet users in many countries will have noticed that sites are sometimes blocked by their ISP for one reason or another. Some ISPs block adult sites by default with their settings for example, with it being on the account holder to “opt out” of this filtering if desired. Why does this happen and is there any way around this?
There often is a way to circumvent automatic ISP filtering of content by simply changing your DNS servers on your router or device from the default ones set by your ISP to custom ones which do not apply this filtering. There are several free DNS services which can allow you to do this but the most commonly used one is Google DNS.
Here are the very quick summary steps to unblock sites using DNS servers:
- Find your network settings under Control Panel
- Go to Network & Internet….Network & Sharing Center.
- Right click on your connection and select Properties.
- Select TCP/IPv4 Properties.
- Select Use the Following DNS Servers.
- Manually input Google DNS Servers (8.8.8.8; 8.8.4.4).
- Click OK to save & exit.
- Your are now using Google’s DNS servers.
- Sites that were blocked by your ISP may now be viewable.
We will cover the steps in more detail further below, including changing your DNS settings at the router level as well as on individual devices.
Why Do ISPs Block Sites?
ISPs use these default DNS servers which often filter and block certain sites for a number of reasons. Most often it is to block access to unsuitable sites such as those with adult related content to make their service more family friendly. Here in the UK it is actually a government requirement of ISPs to offer some kind of family friendly content filtering by default.
Other sites such as torrent and file sharing sites are also sometimes blocked if they have been deemed by court orders or other legislation to be breaking copyright laws.
Sites which stream live sports in breach of broadcasting rights deals have also been known to be shut down in certain countries. Again the UK is quite advanced in this kind of filtering; other countries are more lenient on internet censorship.
This can a source of annoyance for some people though for a couple of reasons. Firstly, some people simply hold the view that it is not the government or the ISP’s business what sites they visit online.
As long as they pay for their internet service they should be free to visit whatever sites they want as long as they are not harming others. There is the ideological opposition to internet censorship on the principle of free speech.
Secondly, default ISP filtering has often been shown to turn up false positives, blocking perfectly harmless sites which contain nothing objectionable or illegal. See here for instance for a couple of examples of ISPs blocking harmless gardening blogs and other perfectly safe sites.
This can be extremely annoying for people just looking to visit harmless sites and the government and ISPs are getting in the way for no good reason.
Internet Censorship Around the World
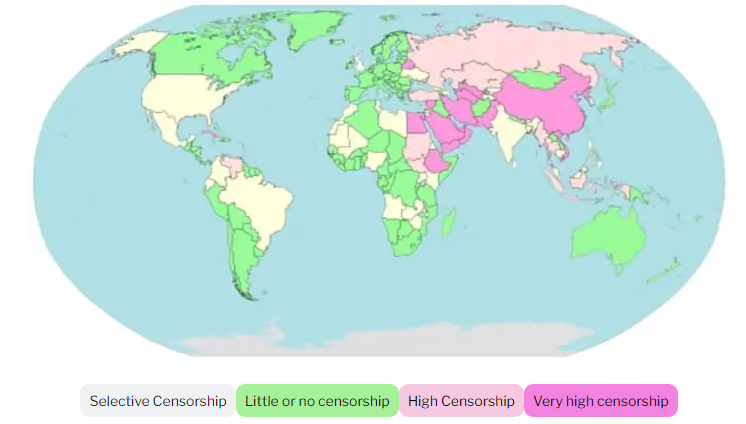
Internet censorship varies in intensity across the world (Image credit: Jeffrey Ogden, Wikipedia)
How to Change Your DNS Servers On Your Router
Changing your DNS servers is usually a very easy process, but where you change them depends on whether you want to unblock one device or all devices on a home network.
If you want to unblock just your device, then change your internet connection settings on that device; if you want to unblock all devices on a home network then change your DNS servers on your router.
Not all routers will allow you to change DNS settings but if your router does then it allows for efficient unblocking to all devices that connect to the router, which can help if everyone at home is getting annoyed by your ISP blocking certain sites.
There are several free DNS servers available to use, but the most well known and commonly used one is Google DNS, whose DNS servers are as follows:
- Google DNS – Primary 8.8.8.8; Secondary 8.8.4.4
- For IPv6 Users – Primary 2001:4860:4860::8888; Secondary 2001:4860:4860::8844
The steps to change on your router are as follows:
- Log in to your router using it’s IP address and username/password, found on the back of router or online. The IP address is most commonly 192.168.0.1 or 192.168.1.1.
- Browse around the menus to see if you can find DNS settings, possibly under “Advanced” or something similar.
- If your router does have DNS settings, then simply replace the current DNS servers with the Google DNS servers listed above.
- Save settings and exit the router.
Changing DNS Servers on a Single Device Only
The general steps to change on your device are listed below. The specific settings and menus differ slightly with each operating system; see here for a full list of how to change DNS settings for each operating system:
Here are the steps for Windows:
- Go to Control Panel/Settings —- Network and Internet —– Network and Sharing Center
- Click Change Adapter Settings on the left
- A list of wired and wireless internet connections configured on your computer should appear. Right click on the one you are currently using (wired or Wi-Fi) and then click Properties
- Select Internet Protocol Version 4 (TCP/IP) and then click Properties again
- The screen posted below should appear. Select Use the following DNS Servers and type in the Google DNS servers (8.8.8.8 and 8.8.4.4).
- Click OK and exit to save settings. You internet connection is now running through Google’s DNS servers instead of the default ones provided by your ISP.
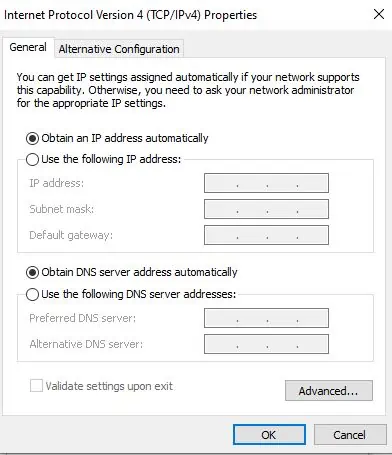
This is the settings screen you should get to on Windows systems to change DNS servers manually – see this video if you prefer a visual demonstration of how to do it.
Here are the steps for iPhones/tablets:
- To change the DNS Settings on your iPhone. Go to Settings….Wi-Fi.….Click the i button…..Configure DNS….Manual….Enter Google DNS servers (8.8.8.8 and 8.8.4.4).
Google DNS do not apply any filtering with their DNS servers, so using them you should be able to access the sites which were blocked before. Being such a big company Google DNS servers usually also work very well and reliably as they have servers in lots of locations.
On the negative side there are privacy concerns as Google can now see what sites you are accessing as you are now routing through their DNS servers, and it has been reported that they keep all DNS records for life.
If this is a concern then you may want to consider using our other option of a VPN below. Also there are a couple of other free DNS service providers which take a more privacy conscious approach to their services, keeping little or no logs of user history. We list them below:
- Cloudflare – Primary 1.1.1.1; Secondary 1.0.0.1
- DNS.Watch – Primary 84.200.69.80; Secondary 84.200.70.40
And here’s some more public DNS servers you can use for free from other bigger tech companies:
- Quad 9 DNS – Primary 9.9.9.9 Secondary 149.112.112.112
- Free DNS – Primary 37.235.1.174 Secondary 37.235.1.177
- Comodo Secure DNS – Primary 8.26.56.26 Secondary 8.20.247.20
- Norton DNS – Primary 198.153.192.1 Secondary 198.153.194.1
What If DNS Servers Don’t Work or I Want More Privacy?
If your device or router does not allow DNS filtering or you want more privacy in your browsing then the other major option that is available is to use a Virtual Private Network or VPN to circumvent ISP content filtering.
A VPN is a more advanced piece of software which will actually create a virtual tunnel for all your browsing traffic to keep it hidden from your ISP and anyone else. This has a privacy and security advantage to simply using different DNS servers as your browsing is now unblocked but also totally secure and private.
There are now loads of different VPN services available, all of which pretty much do a similar job of masking your IP address and routing your traffic through a server based in another region or country. That way your ISP cannot see what you are browsing and block any sites as a result.
Whilst there are some good free VPN services available like ProtonVPN and PrivadoVPN, we recommending going for a paid service for anything other than the most basic and occasional browsing, as free VPN services are in our experience painfully slow and unreliable. With reliable paid services available from just a few dollars a month we consider it worth the investment if freedom and security of browsing is important to you online.
What If I Actually Do Want to Filter Sites Using DNS Servers?
If you actually have the opposite problem and there is no filtering of your current content and you want to start actively filtering it, you can also use DNS servers in the reverse way to block certain sites. This can be for people with young families for instances that don’t want their kids accessing adult orientated content online.
The process is exactly the same as we described; you just modify your current DNS servers to ones which do offer active content filtering. The best known free service to use for this is Open DNS, who operate an active Family Shield filtering service that specifically blocks adult content. You just change your DNS servers to the ones below:
- Open DNS – Primary 207.68.222.123; Secondary 207.68.220.123
This is the default service which will block adult sites by an advanced filter list they continually update. They also have other services you can use to block other types of content such as gambling, violence etc. See their page on their different free and paid services for more details.
This kind of filtering is best done at the router level if your router allows it and it is practical, since this will apply it to all devices on the home network. As long as you then change your router admin password then in theory you will have access to these settings and they therefore can’t be changed or over-ridden.
Of course if you don’t want to apply the filtering to every device at home then you will have to change DNS servers to Open DNS for each individual device you want to apply the filtering to. This of course makes it easier to over-ride on each device as finding and changing DNS servers is not difficult on the device level.
Setting admin and standard user accounts can help with this on certain devices. This is where you set a master or admin account on a device which you use to change and lock DNS and other network settings. You then set up standard user accounts on the device which do not have admin privileges and therefore cannot change these settings. See this post for an explanation of how to do this.
Depending on how you do it then, using DNS servers to filter internet content can be a basic method of access control to certain sites, but it can also be sometimes circumvented by tech savvy adults and teenagers especially at the device level and is not always fool-proof.
Using admin privileges or DNS filtering at the router level is more effective but could still potentially be bypassed by someone determined and clever enough using proxy servers or free VPN services. For people with very young and non technical families though DNS filtering can be an effective basic step for content filtering and access control on a home network.
Also, if you are wanting to filter sites or impose parental controls at the device level, check out ClevGuard, who are an excellent provider of parental/access control and monitoring solutions for all major devices in the home, including phones.