
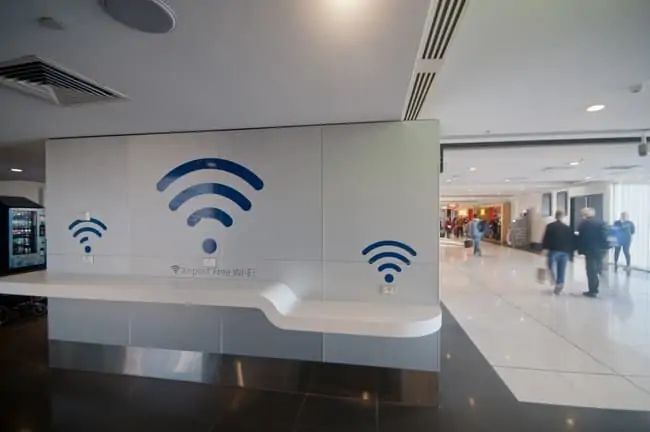
VPNs are rightly recommended as an essential security tool for anyone using public Wi-Fi, but content is thin on the ground on how to troubleshoot any issues with getting VPNs to connect when on public Wi-Fi.
We want to try and correct this in this blog post by providing some quick tips if you are struggling to get online with a VPN when on a public Wi-Fi network. It is true that establishing the VPN connection on public networks isn’t always as straightforward as on a home network, as there are differing levels of security on different networks.
Here are some quick tips if you cannot connect using a VPN on public Wi-Fi:
- Login to the public Wi-Fi before turning on the VPN
- Move around for a better signal.
- Try switching ports and protocols
- Try disconnecting and reconnecting to the Wi-Fi
- Try restarting devices.
- Switch your DNS servers back to Automatic if needed.
Note that in this guide, we’re troubleshooting the scenario where you can open the VPN program, but you can’t connect to a server. If you’ve got the more basic problem of not even being able to open/load/start the VPN application itself, then see our separate guide for this.
Let’s run through each of these points in more detail.
Login To The Public Wi-Fi Network Before Enabling The VPN
This is a very important first point to make – depending on the security level, some public Wi-Fi networks will require you to login to their network on an open connection before you enable any VPN software. If you try to just turn on the VPN before connecting through their login/T&Cs page, it may block the VPN from even connecting.
If you are trying to open a VPN server connection, and it just won’t connect, firstly try opening up a web browser without the VPN enabled, and see what happens. Often, as long as you’ve actually connected your device to the public Wi-Fi access point from your network list, a login page may appear, where you might have enter some personal details, possibly pay if it isn’t free Wi-Fi, and accept Terms and Conditions.
Unfortunately, this is just the way public Wi-Fi is run nowadays, especially in larger airports, train stations, and other businesses. They often don’t just let you connect and surf right away – there’s often now a login page where they want some details and to accept their terms before they connect. In some places it’s still very free and open to connect, but in others it’s more restricted and and not just “one click and surf”.
If you’re prepared to go through these signup/login pages, and get to the point where you can browse websites freely, then you should be able to open a VPN connection to make your browsing more secure. But in may public places, there’s an initial login process you might need to go through without the VPN turned on to get started.
I get this will be annoying and some readers may see this as defeating the object of a VPN in the first place, when we have to enter details initially on an open connection to get started. However, it’s just the initial process to get started, and if they run their network halfway properly, then any login/signup pages will be fully encrypted with the green padlock to make it safer. Then once you’re fully online, you should be able to turn your VPN on to make it even safer.
Airport Wi-Fi in particular is often quite strict and requires a signup process before it can be used
The Signal May Be Too Weak (Move Around)
This might be another simple reason why the VPN won’t connect – the signal is just too weak and inconsistent for the software to establish a stable connection. Public Wi-Fi in general can be very patchy and inconsistent, especially in larger places like airports, so try moving around a bit to get a better signal.
Here’s some other quick things to try regarding the signal:
- Try disconnecting and re-connecting to the public Wi-Fi on your device
- Try restarting your device to refresh the connection.
- Move away from any obviously large obstructions like thick walls to see if the signal improves
- Some VPNs also have a feature in them to use different encryption/connection protocols which can handle inconsistent/weak Wi-Fi signals better. Play around in your VPN’s Advanced/Network settings to see if there’s something you can toggle on to help with this.
Try Using Different Connection Protocols
This is another thing to try – most Premium VPNs offer different connection protocols, which often trade-off security for speed and connection quality.
Some common protocols you’ll be able to choose from are:
- OpenVPN
- IPsec
- IKE
- L2TP
- PPTP
- SSTP
- WireGuard
Try connecting with all the different available protocols. One particular one might be having problems, but another works fine and you can connect. It might be that the network blocks one particular VPN connection type, but allows others.
Try A Different VPN (Especially ProtonVPN)
This is another thing you can try especially on public Wi-Fi networks in libraries and universities, since they can often have more restrictive network settings that block VPN usage. I’ve found this most recently trying to use the open Wi-Fi at my local public library network.
The VPNs I normally use are totally fine on most public networks (bars, restaurants, stations etc), but specifically when I try to use them specifically on the local library network, they won’t connect. You might find you can use the network unprotected, but all the VPN servers suddenly go to “red bar” weak signal or no signal in the interface, like they’re being blocked by the network.
The only way I found around is to specifically use ProtonVPN, which does have a free version and which always seems to connect right away even on this library Wi-Fi, when other free VPNs won’t. Perhaps it’s a more advanced app, or better coded, or has better protocols.
Whatever it is, ProtonVPN seems to work on some public Wi-Fi networks when other VPNs don’t, so try downloading and using this if you’re having problems connecting a VPN in one specific public place, though you are limited to 3 locations on the free version – Netherlands, Japan, USA.
See our full article on connecting a VPN specifically on tricky university/library networks, if this is the place you’re having problems.
Try Using Different Ports
This is another setting you can often adjust from within your VPN settings menu if you feel confident. The Wi-Fi network you are connecting to may block certain ports from sending/receiving data.
One popular port that is often blocked to try and stop VPN usage is 443. If your VPN is currently using this and cannot connect, try switching it to something else.
Also try switching away from UDP protocol if that’s what your software is currently using, since this is also often blocked or restricted by public network administrators.
Switch Your DNS Servers Back To Automatic If Needed
This is another issue that can block the VPN making the initial connection it needs to to get online. If you are using custom DNS servers (eg. Google DNS – 8.8.8.8; 8.8.4.4), and you try to connect to a public Wi-Fi network, it often won’t work, because the network needs to use it’s own DNS servers to establish the initial connection to the login/access page. You’ll be able to connect to the Wi-Fi access point, but you won’t be able to browse online without going through the signup/login page.
To fix this, just temporarily switch your DNS servers back to Automatic/Default, to allow the public Wi-Fi provider to use their own servers to connect you to their login/start-up page (you can switch them back later once you are fully connected and online if you want to).
Here are the steps to do this for Windows:
- Windows 7 – Go to Control Panel —- Network and Internet —– Network and Sharing Center
- Click Change Adapter Settings on the left
- For Windows 10 – Click the Windows sign (bottom left corner, then the Settings cog. Click Network & Internet, and under Advanced Network Settings, click Change Adapter Settings
- A list of wired and wireless internet connections configured on your computer should appear. Right click on the one you are currently using (wired or Wi-Fi) and then click Properties
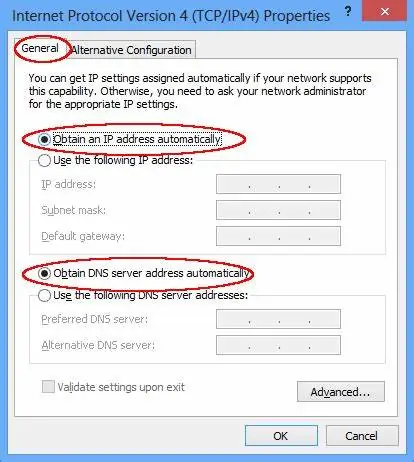
- Select Internet Protocol Version 4 (TCP/IP) and then click Properties again
- The screen posted below should appear. Make sure the highlighted boxes below are selected; Select Obtain DNS Servers Automatically if you’re currently using Custom ones.
- Click OK and exit to save settings. You internet connection is now running through the default DNS that the public Wi-Fi network chooses rather than your own ones. This allows you to access the initial login page to get onto the Wi-Fi.
Here’s how to change DNS selection back to Automatic for iPhones:
- To change the DNS Settings on your iPhone. Go to Settings….Wi-Fi.….Click the i button…..Configure DNS….. Then make sure the Automatic/Default option is selected for choosing DNS servers.
Once your device is using the default DNS servers, this usually allows you to connect straight to the public Wi-Fi network as normal, and then you can either browse online straight away or just click through a simple page to logon and start using. But the public Wi-Fi network needs to be able to use it’s own DNS servers to start this login process.
Note – In rare cases, you could also try the reverse process of what we just covered (i.e. switching your DNS servers from Automatic to Manual, and using Google DNS 8.8.8.8 and 8.8.4.4), and this may also help you connect depending on how the network is configured. I’ve known this to work as well, but realistically it’s more likely that switching to Automatic will help you get logged on to most public Wi-Fi networks.